A couple of months ago, Alfresco released the latest version of its Records Management module, so we thought we would write a blog about the main feature of RM 2.5. Branded as Alfresco One Records Management Module, RM 2.5 main feature is about security control and classification lifecycle.
What is classification and why it’s important?
Classification is an additional security layer besides the default Alfresco ACL which allows controlling access to content using metadata marks. And only users having the required marks can access the content. We will discuss the metadata marks later in this blog.
Besides being critical to Defence department or the government, classification becomes very important when you have documents which contain highly valuable or sensitive information such as documents containing Personal and Private Information (PPI)(e.g passport number) or commercially sensitive information (e.g profit margin, trade secrets).
How classification works?
Classification is implemented via Security Controls which in turn consists of Security group and Security Marks. Out of the box, RM 2.5 comes with a predefined Security group called Classification Security. Classification Security consists of metadata marks which are as follows;
- Classification Levels which are set at a document level- Top Secret, Secret, Confidential and Unclassified
- Clearance Levels which are set at a group or user level- Top Secret, Secret and Confidential
Classification is a two-step process, firstly assigning the clearance level to the desired user or group and secondly setting up the classification level (to classify) on the desired document.
- Assigning Clearance Level
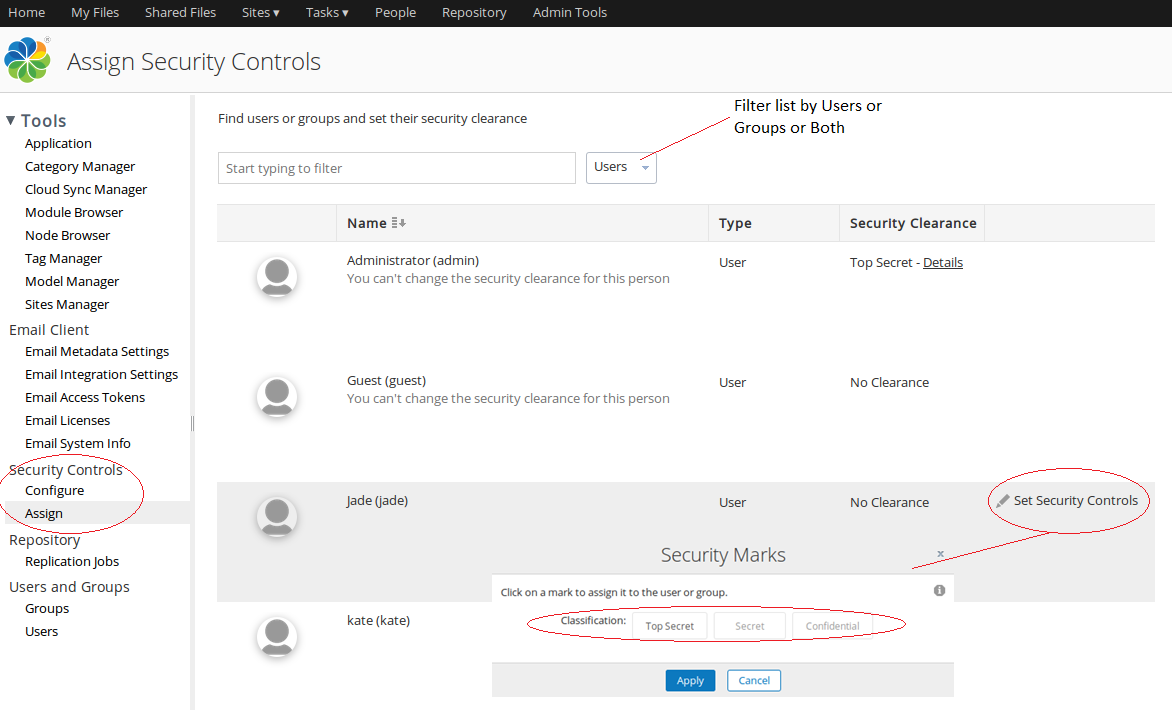
In order to assign the Clearance Level, Alfresco administrative privileges are required. As shown from screenshot below, go the Alfresco Admin Tools page, under Security Control click on Assign
From the corresponding users/groups list page, hover over the desired group or user and click on Set Security Control.
Then choose the desired clearance level from the pop up window (e.g Secret) and hit apply.
This means that user Jade would be able to see all documents which have a classification level of Secret or below but not Top Secret.

- Setting the Classification Level
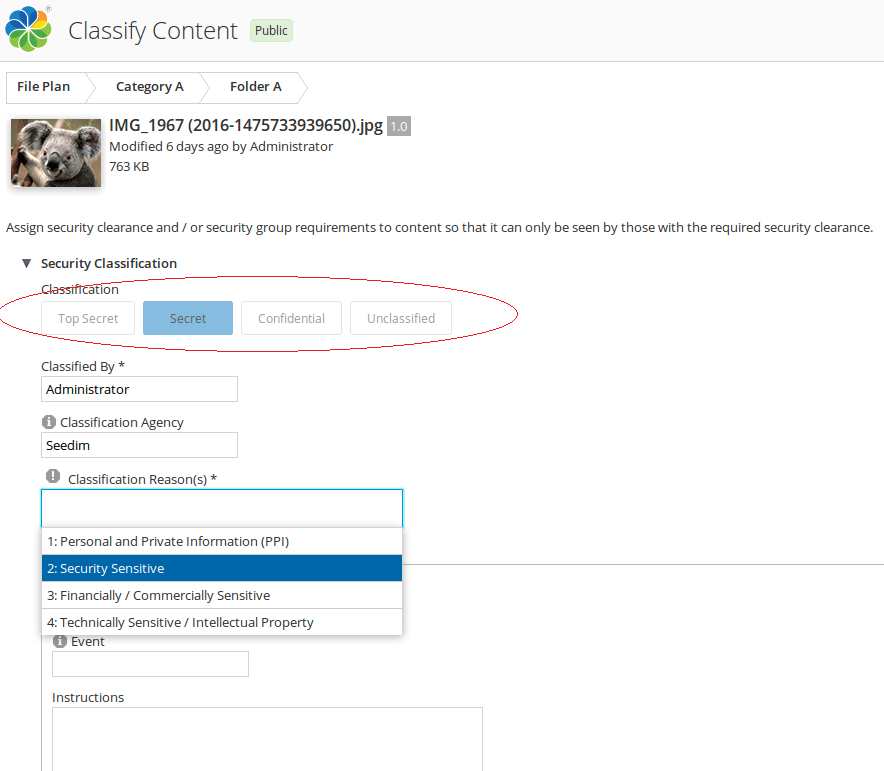
Go to record you want to classify and from the properties action click on Classify. Then as shown in the screenshot below, click on the desired classification level (e.g Secret) and choose the classification reason from the drop down menu. Finally hit the Classify button.
Note 1
The Classification reason is mandatory and as shown below screenshot, out of the box there are only 4 classification categories and more than one classification reason can be selected.
Note 2
The Downgrade Schedule and Declassification Schedule are all manual process, so setting a date in the downgrade Schedule section does not downgrade the classification of the document automatically when the date is reached.

Once the record has been classified (in this case as Secret), the tag of secret is displayed besides the record and is visible on to user/group having the Secret or Top Secret level clearance.
Conclusion
In this blog we focused mainly on the out of the box Classification Security control and how classification works. While Classification was the main feature of RM 2.5, an additional config worth pointing out is the ability to set which group can perform Records Management actions such Declare as Record. By setting the following in alfresco-global.properties, only members of the RECORD_CONTRIBUTORS group can perform the RM actions.
rm.record.contributors.group.enabled=true

