Out of the box, Activiti provides throw a signal element which can be used to start another workflow or another task but there is no throw a message element as such. A message is more of complex kind of signal and the main difference between a signal and message is that the message has a body which allows variables to be passed. So in this blog we are going to show how to implement a message thrower in Activiti.
Implementing a Message Thrower in Activiti
As mentioned above, by default, there is no message thrower element in Activiti. So this needs to be implemented in code and we are going to do so by creating a custom spring bean in JAVA. Our custom spring bean will throw a message with variables such as name, phone and email and allow our workflow to continue. So we start by creating a java class called MessageThrower in the package com.activiti.extension.bean. Note that putting the java class in that package makes it automatically available when Activiti is loaded. As shown in the code snippet below, we use the annotation @Component to register our bean with the name ‘messenger’which will be used in our actual workflow. We have a method called sendMessage(String messageId, String name, String email, String phone) which will be called from our workflow to do the actual work.
@Component("messenger")
public class MessageThrower{
     @Autowired
     private RuntimeService runtimeService;
     public void sendMessage(String messageId, String name,
String email, String phone){
     System.out.println("Sending Message");
     for (Execution exec :runtimeService.createExecutionQuery().
messageEventSubscriptionName(messageId).list()) {
      runtimeService.messageEventReceived(messageId,
      exec.getId(), makeMap(name, email, phone));
             }
            }
    private Map<String, Object> makeMap(String name, String email, String phone){
            Map<String, Object> map = new HashMap<String, Object>();
                             map.put("name", name);
                             map.put("email", email);
                             map.put("phone", phone);
                             return map;
              }
}
Workflow with Message Thrower
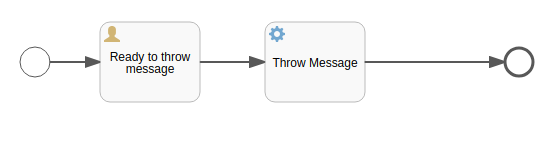
So now that we have implemented our custom bean, let see how we can use it in a workflow. We start up be creating a simple workflow as shown below.
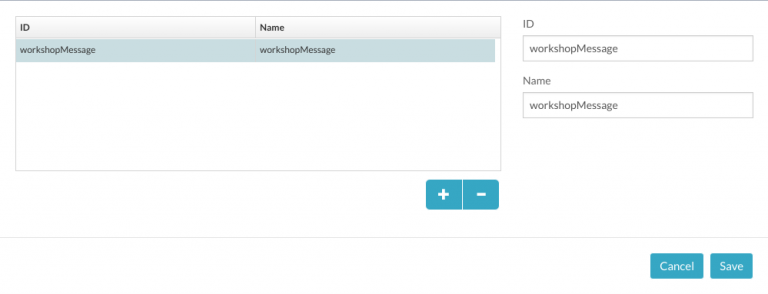
Since message signal is always Global and not restricted to a particular process, before we start looking at the components of the workflow, we need to define a Message ID to use. We do that by clicking on the Message definitions property of the workflow.

Then fill in the ID and Name of the message. Note we have used workshopMessage as the message id and this will be used in the next section.
Workflow Components
The components of the workflow are as follows;
Start Event – Starts the workflow
User Task – Initiates the process
Service Task
Since there is no message throwing element, we are using a service task to call our custom spring bean with the name ‘messenger’ which in turn calls the method sendMessage by passing the message id (which we defined earlier), name, email and phone number. The Expression property on the service task is configured as shown below;
${messenger.sendMessage(“workshopMessage”,”Seed”,”seed@seedbpm.com”,”12121212″)}
Conclusion
In this blog we have demonstrated how we can leverage a custom spring bean that throws a message from a workflow. The custom spring bean can be used in any workflow. For example, we can have an Intermediate Message Catching Event task on different workflow which can wait for our message signal from our Message Throwing Workflow and use the passed in variables such as name, phone ..etc for some other process. Message Reference property on the Intermediate Message Catching Event should be set to the same message id and message name as in our Message Throwing Workflow.